You're probably reading this because brakes have moved from “one more system to revise” to something more serious. Maybe you're preparing for a C1 or Category C test. Maybe you've already driven vans or rigid vehicles and realised that stopping a loaded vehicle on a wet descent feels very different from stopping a car.
That feeling matters.
When you're coming down a long hill with weight behind you, you don't get to guess how the brake system works. You need to know what the pedal is telling you, what a soft response might mean, and what faults must stop the vehicle from moving at all. For a professional driver, brake knowledge isn't extra theory. It's part of staying safe, staying legal, and staying in work.
Why Every HGV Driver Must Master Hydraulic Brakes
A new driver often notices braking properly for the first time on a downhill approach to a roundabout. The vehicle is loaded, the road is damp, traffic ahead slows earlier than expected, and suddenly the brake pedal doesn't feel like a simple control. It feels like the one thing standing between a routine drive and a dangerous mistake.
That's why hydraulic brake systems matter so much on C1 and some Category C vehicles. You're not just pressing a pedal. You're controlling a system that has to turn your foot pressure into enough braking force to slow several tonnes in a straight, stable, predictable way.
What this means on the road
On UK roads, problems don't always arrive as a dramatic failure. Sometimes the first warning is subtle:
A longer pedal travel than yesterday
A spongy feel when you first press down
A vehicle pull under braking
A change in confidence when approaching junctions or gradients
A careful driver pays attention to those signs early.
Practical rule: If the brake pedal feel changes, treat it as a safety issue until proven otherwise.
The reason instructors push this so hard is simple. Hydraulic brakes sit at the centre of several professional skills at once. You need them for your walkaround checks. You need them for safe road positioning. You need them for controlled stops in traffic. You also need enough understanding to explain defects clearly if an examiner, operator, or workshop asks what you found.
Why test standards and real driving meet here
DVSA test standards don't reward drivers who memorise words without understanding the system behind them. A good answer during training links the fault to the risk. If fluid escapes, pressure drops. If air gets in, the pedal can feel soft because air compresses. If components don't apply force evenly, the vehicle may not brake as it should.
That's the standard you should aim for. Not “I know the name of the part”, but “I know what it does, why it matters, and what bad operation feels like from the driver's seat”.
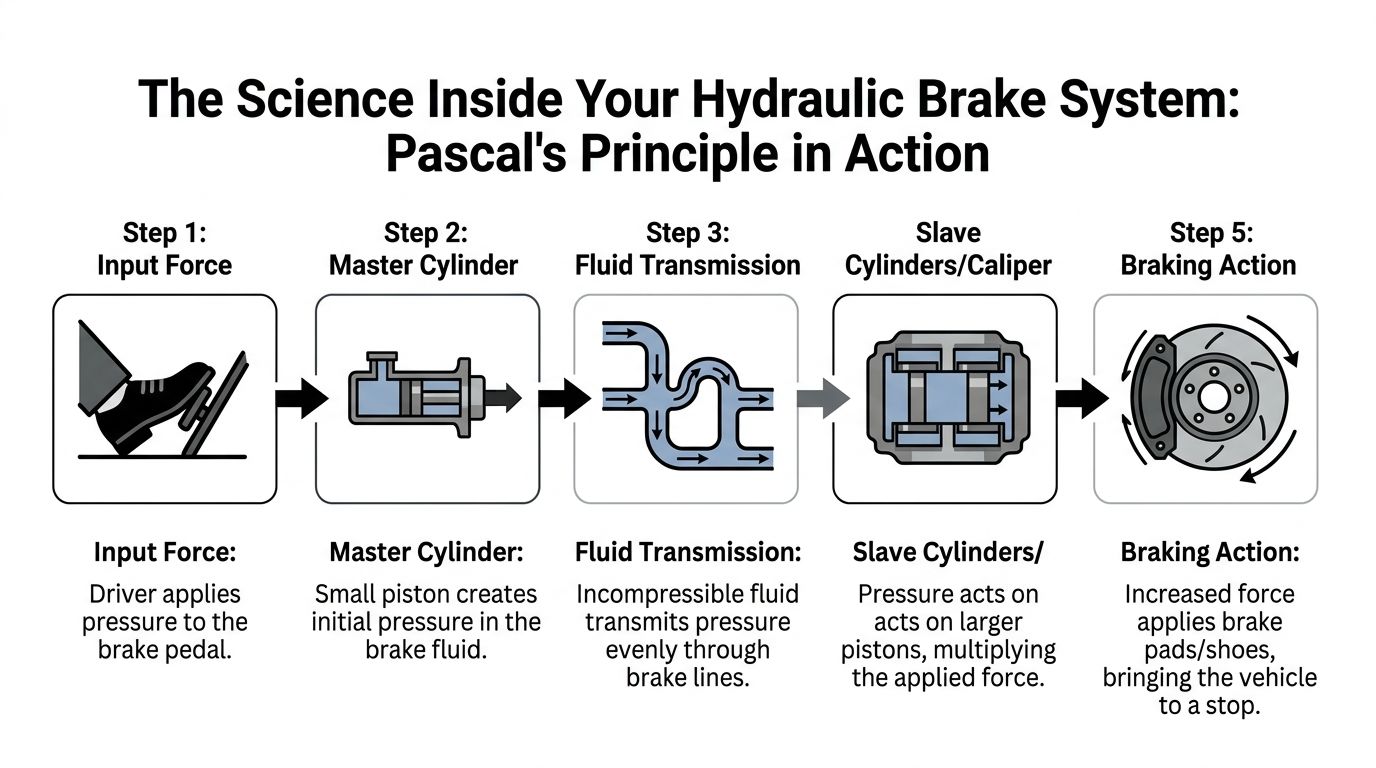
The Science Inside Your Hydraulic Brake System
Hydraulic braking sounds technical until you reduce it to one idea. A sealed fluid can pass pressure from one point to another very effectively. That's the whole system in principle.
Think of squeezing a sealed bottle full of liquid. If the bottle and pipework are intact, the force you apply gets carried through the liquid. In a brake system, that pressure travels from the pedal end of the system to the wheel end.
Pascal's law in plain language
The key rule is this. Brake fluid doesn't compress the way air does, so pressure can be transmitted evenly through a closed system. According to this explanation of brake hydraulics and DVSA-relevant hydraulic law, if you apply 10 psi at the master cylinder, 10 psi acts uniformly on all brake calipers.
That only works if the system stays closed, fully fluid-filled, and leak-free.
If air enters, the logic changes. Air compresses. Some of your pedal movement then gets wasted squashing trapped air instead of pushing brake parts firmly into action. That's why a brake pedal can feel springy or delayed when the system has air in it.
The five-step force path
A driver should be able to picture the process from foot to wheel:
Pedal input Your foot starts the process. Even a moderate push creates force at the pedal.
Master cylinder action The pedal moves a piston inside the master cylinder. That piston pressurises the brake fluid.
Pressure through brake lines The fluid carries that pressure through pipes and flexible hoses to each wheel brake.
Wheel-end operation At the wheel, the pressure acts on pistons in a caliper or wheel cylinder.
Friction slows the vehicle Those pistons force pads onto a disc, or shoes onto a drum, and friction slows the wheel.
That sequence is worth memorising because it helps you diagnose faults. If the pedal moves but the vehicle doesn't slow properly, the problem has to sit somewhere along that chain.
Why a small push can stop a heavy vehicle
This confuses a lot of trainees. They wonder how one foot can stop a loaded vehicle.
The answer is force multiplication. The system uses pressure and piston area to increase the effective force at the wheel. You don't need huge leg strength because the hydraulic arrangement does the heavy work for you. Your job is to apply controlled input and recognise when the system no longer responds normally.
Pressure is shared through the fluid. Braking force is then created where that pressure acts on components at the wheels.
Where learners often get it wrong
Many people mix up pressure and force. Pressure is what the fluid carries. Force is what the brake parts apply at the wheel.
A second confusion is thinking fluid level alone tells the full story. It doesn't. A reservoir can still show fluid while the system has another issue, such as trapped air or a fault affecting how pressure reaches part of the braking circuit.
Keep the core principle simple. Hydraulic brake systems only work properly when the fluid path is sealed, full, and free from air.
Understanding HGV-Specific Brake Components
The parts in an HGV hydraulic setup do the same basic job as those in smaller vehicles, but they have to cope with heavier use, higher stress, and stricter safety expectations. That changes what you'll see during checks and what matters during training.
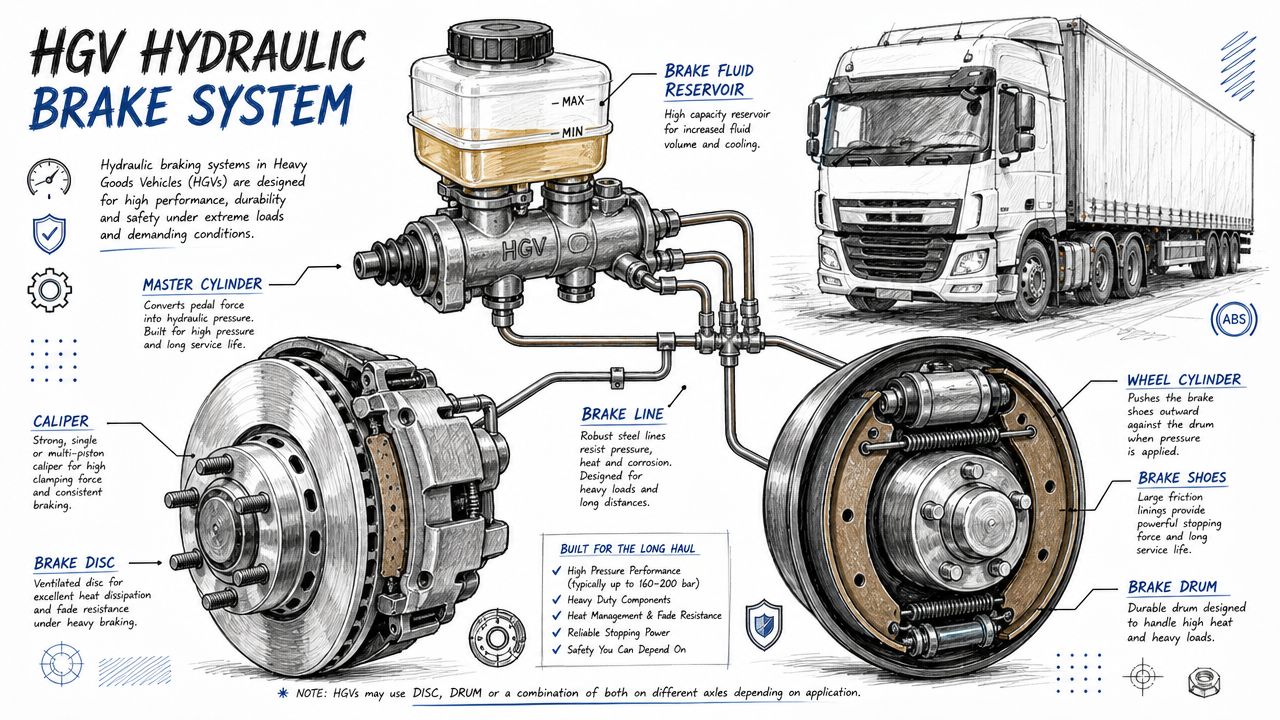
The parts that deserve your attention
Start with the master cylinder. In professional use, this isn't just a pressure maker. It's a safety-critical component that supports split braking function. Modern systems moved away from the old single-circuit approach because a single failure could leave the whole system ineffective.
Then there are the reservoir and lines. The reservoir stores the brake fluid, but inspection rules matter here. On compliant vehicles, fluid checks are made through transparent reservoirs or integrated indicators. You shouldn't be removing caps during routine inspection. The lines must stay sealed and in sound condition because any leak threatens the whole pressure path.
The calipers, discs, drums, wheel cylinders, and shoes or pads do the physical braking work. On heavier vehicles, these parts deal with more heat and more load transfer than the same components on a typical car.
The valve many new drivers overlook
One component catches trainees out because they've often never heard of it before practical instruction. In many HGV hydraulic systems, a pressure-restricting valve is fitted on front disc brake applications. According to this heavy vehicle hydraulic brake system reference, it delays front disc activation until the rear drum brakes engage, and it typically opens at 130–135 psi.
That matters because front-end lock-up on a heavy vehicle can destabilise the stop. The valve helps braking stay balanced under load.
Training point: If you only know “the brakes work”, you'll miss why balanced braking matters. If you know what the valve does, you understand why the vehicle stays more stable under heavy application.
HGV details that differ from car thinking
A car guide often leaves out the details that matter for goods vehicles. HGV-spec hydraulic brake systems use tougher pipework, stronger fittings, and layouts designed for commercial conditions. The brake lines in these systems may use double-flared ISO hydraulic lines built to ISO specifications for high-pressure, leak-free service in commercial operation.
Brake fluid choice also matters more when a vehicle is working hard. Some heavy-duty guidance for HGV use points drivers and technicians towards DOT 5.1 where higher temperature stability is needed. That isn't the sort of detail a beginner needs for topping up at the roadside. It is the sort of detail that helps you understand why workshops must use the right fluid for the specific vehicle.
What to look for in inspection language
When you describe these parts, keep your language practical:
Master cylinder means the unit that creates hydraulic pressure from pedal movement
Brake lines and hoses carry fluid under pressure
Calipers or wheel cylinders convert fluid pressure into mechanical movement
Pads, shoes, discs, or drums create friction to slow the wheels
Pressure-restricting valve helps manage front and rear brake timing in some HGV layouts
That level of description is clear enough for training and useful enough for real defect reporting.
Hydraulic Brakes Compared to Air and By-Wire Systems
Drivers moving through different licence categories often assume every braking system feels broadly the same. It doesn't. The system type changes how the pedal responds, how faults show up, and what checks matter most.
Hydraulic systems are common on lighter commercial vehicles and some HGV classes. Air brakes dominate heavier goods vehicles. Brake-by-wire adds electronic control over the braking request while still relying on underlying brake hardware.
What a driver usually notices first
A hydraulic setup often feels more direct. Press the pedal and the response tends to feel immediate and connected. That can help newer C1 or Category C drivers because the pedal feel is familiar if they've driven cars or vans.
Air brakes feel different. There's a different system logic behind them, different fault checks, and different operating habits. A driver has to think about air pressure build-up, warning systems, and the behaviour of service and parking brakes in a way that doesn't apply in the same form to a hydraulic layout.
Brake-by-wire adds another layer. The pedal input becomes an electronic request interpreted by a control system, which then commands braking effort. The driver may notice a more managed feel, especially where stability and electronic assistance systems are involved. If you want a wider look at where commercial vehicle tech is heading, this overview of changing HGV technology gives useful context.
Brake system comparison
Characteristic
Hydraulic Brakes
Air Brakes
Brake-by-Wire
Typical feel
Direct pedal feel
More system-managed feel
Electronically interpreted input
Power transfer
Fluid pressure
Compressed air
Electronic command plus braking hardware
Common vehicle use
Cars, vans, lighter commercial vehicles, some HGV applications
Larger HGVs and articulated lorries
Newer vehicles with advanced electronic control
Driver concern in daily use
Leaks, fluid condition, air in lines, pedal feel
Air pressure, leaks, warning systems, brake lag
Sensor, actuator, and electronic system behaviour
Typical training focus
Hydraulic pressure path and defect signs
Air system checks and safe operation
Understanding system response and warnings
Fault feel from the seat
Spongy, soft, low, or uneven pedal response
Pressure-related warnings or reduced brake readiness
That's the wrong question. The right question is whether the driver understands the system fitted to the vehicle they're using today.
Hydraulic brakes can be very effective, but they depend on fluid integrity and a sealed circuit. Air brakes suit larger heavy vehicles well, but they bring their own operating discipline. Brake-by-wire can improve control and system integration, but only if the vehicle is maintained properly and the driver responds correctly to warnings.
A professional driver doesn't need brand loyalty to a brake type. They need system awareness.
Inspecting for Common Hydraulic Brake Failures
Brake faults rarely announce themselves politely. A vehicle may still move, still stop, and still feel “mostly fine” right up to the point when it isn't. That's why inspection discipline matters more than confidence.
The risk is real in heavy use. The DVSA reported that 28% of annual HGV roadside failures in 2024 were linked to brake system performance issues, with 65% of those attributed to degraded fluid or air bubbles, and UK HGVs can face up to 40% higher thermal stress on brake fluid than cars according to this hydraulic brake analysis covering UK HGV conditions. Those numbers explain why fluid condition and air ingress deserve serious attention.
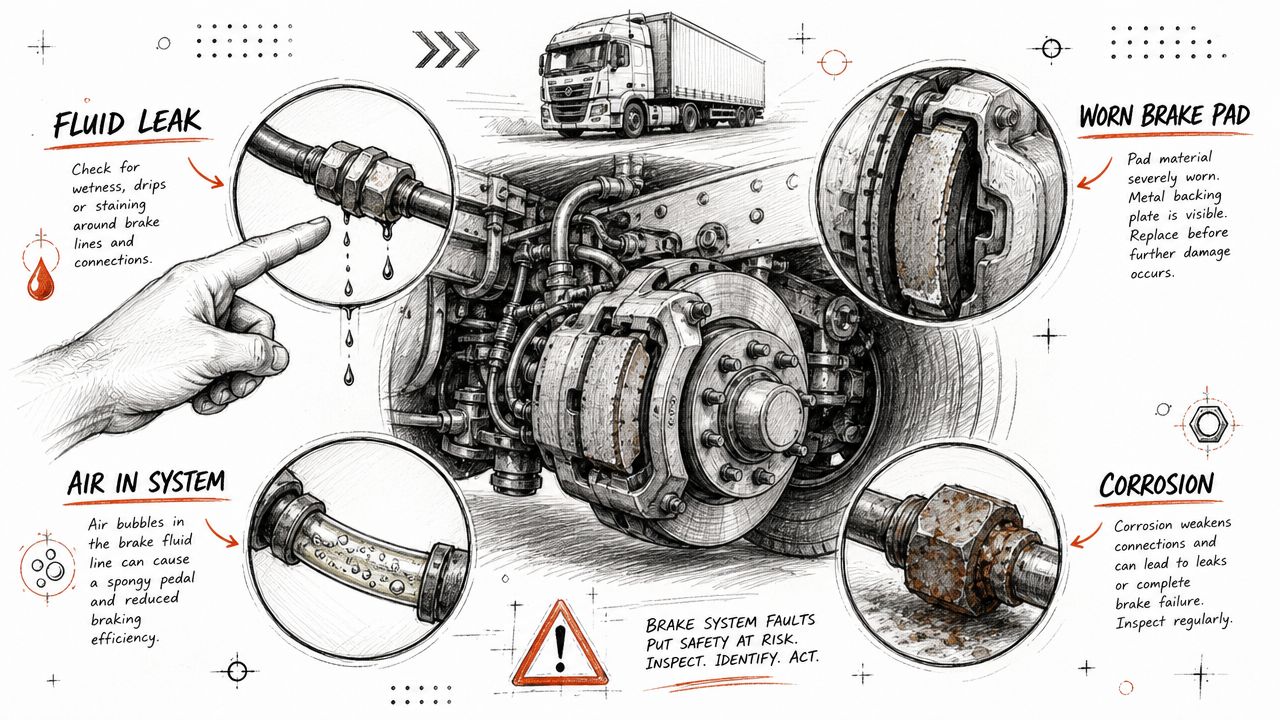
The faults drivers meet most often
The first is the soft or spongy pedal. Drivers usually describe it as a pedal that travels too far or feels springy. In simple terms, that often points to air in the hydraulic circuit. Since air compresses, part of your pedal force gets absorbed before the wheel brakes apply firmly.
The second is brake fade. This tends to show up after heavy use, repeated braking, or long descents. As fluid gets too hot or takes on moisture over time, braking can become weaker or less consistent.
The third is the visible leak. That may appear as wetness around lines, hoses, unions, calipers, wheel cylinders, or beneath the vehicle. A leak is never a minor cosmetic issue in a hydraulic brake system. It means the sealed pressure path is under threat.
What daily checks should include
Your walkaround should be calm and methodical, not rushed and hopeful. Use the same sequence every time.
Check the reservoir condition through the sight area or indicator if fitted. Don't remove the cap during routine inspection.
Look under the vehicle for fresh drips or staining that could point to fluid escape.
Inspect visible lines and hoses for damage, rubbing, corrosion, poor routing, or damp areas.
Watch the wheel areas for signs of fluid around brake assemblies.
Assess pedal feel before moving off. A pedal that feels lower, softer, or inconsistent needs attention.
Notice vehicle behaviour during the first low-speed brake application. Pulling, delay, or poor response all matter.
If you want a wider check structure to support your daily routine, this HGV inspection manual guide is a useful reference point.
What faults feel like in motion
A fault doesn't always present the same way to every driver, so link the symptom to the likely issue rather than guessing.
Symptom
What it can suggest
Driver response
Soft pedal
Air in the system or pressure loss
Stop and report before normal operation
Pedal sinks lower than usual
Fluid loss or internal hydraulic issue
Treat as unsafe
Weak braking after repeated use
Heat-related fade or degraded fluid
Reduce risk immediately and report
Vehicle pulls when braking
Uneven brake operation side to side
Do not ignore it
Fluid visible near components
Leak in the hydraulic circuit
Vehicle needs attention before service
Don't wait for total failure. Hydraulic brake faults often start as feel, not noise.
A sensible routine for trainees and working drivers
Many learners over-focus on visible parts and under-focus on feedback through the pedal. That's a mistake. Your feet are part of the inspection process.
A sound routine looks like this:
Start with the parked check Look for leaks, damaged lines, low visible fluid indication, and anything out of place.
Use the pedal before moving Press it firmly and notice travel, resistance, and consistency.
Test at very low speed Confirm the vehicle brakes in a straight, predictable way.
Stay alert during the first part of the journey Some problems appear only once components warm up.
This video gives a helpful visual look at hydraulic brake issues and servicing points:
When the vehicle must not go
Drivers sometimes talk themselves into continuing because the vehicle still stops. That's not a safe standard. If you have a suspected leak, clearly abnormal pedal feel, poor braking balance, or signs of degraded hydraulic performance, the correct move is to report it and prevent normal use until it's checked properly.
That habit protects you, your operator, and everyone else on the road.
Hydraulic Brakes and UK Driving Regulations
Brake knowledge becomes more important when you link it to law. The system isn't just there to help you stop. It has to meet legal standards, and drivers are responsible for operating vehicles that comply with those standards.
One of the biggest safety developments came when regulations began requiring dual-cylinder braking systems in 1967. As explained in this history of master cylinder development and brake safety, the move meant that if one hydraulic circuit failed, the other could still provide braking power. The same source describes that standard as being estimated to prevent tens of thousands of accidents annually. That change is a major reason modern hydraulic systems are far safer than the old single-line layouts.
Trailer rules matter too
Drivers who deal with trailers need to understand that UK rules don't treat every hydraulic arrangement as acceptable in all conditions. According to this UK trailer braking guide, single-line hydraulic brake systems are legally prohibited for use at speeds above 40 km/h, which is about 25 mph, and heavier trailers must be modified to safer failsafe arrangements or linked service braking.
There are also speed-based braking performance rules. For trailers operating below 20 mph (32 km/h), the UK guidance on trailer brakes and couplings states the service brake must achieve 25% braking efficiency when fully laden and act on at least half the wheels or axles. Above that speed threshold, the minimum requirement rises to 45%.
Parking brake rules also have their own standard. For trailers above 20 mph, this agricultural engineering trailer guide says the parking brake must hold a laden, uncoupled trailer on a 16% slope.
What this means for a professional driver
These aren't workshop-only facts. They explain why examiners, instructors, transport managers, and enforcement officers take brake defects so seriously. A driver doesn't have to rebuild the system, but they do need to recognise when operation, condition, or configuration could fall outside legal safety standards.
Professional standard: Know enough about the brake system to identify danger, report defects clearly, and refuse unsafe operation.
Brake competence isn't separate from professional driving. It is professional driving.
If you're working towards a C1, Category C, or C+E licence and want support that's built around safe, compliant driving, HGV Learning can help. Their training pathway covers theory, practical preparation, and licence progression with DVSA-aligned support across the UK, helping new and experienced drivers build the knowledge and habits that matter on the road.
What Age Can You Start HGV Driver Training? A 2026 UK Guide to Licence Age Requirements
If you're asking what age you can start HGV driver training, the honest answer depends on which licence you're after. A C1 licence, covering vehicles...