You're probably doing it now. Keys in hand, first brew half finished, walking round the unit before the day starts. Most drivers give the fuel tank a quick glance, make sure the cap's on, and move on.
That's where trouble starts.
A proper fuel tank inspection isn't just about whether you've got enough diesel to finish the run. It's about roadworthiness, spill prevention, fire risk, paperwork, and whether DVSA decides your vehicle keeps moving or gets parked at the roadside. Good drivers understand that the tank check sits right in the middle of professional standards. It protects your licence, your operator, and everyone else sharing the road with you.
Why Your Fuel Tank Check Is More Than Just a Glance
The fuel tank is easy to ignore because most faults develop slowly. A loose strap doesn't usually fail in the yard. Rust round a seam doesn't leak on day one. A damaged cap seal might only leave a faint stain. That's why poor habits build up. Drivers stop looking properly because nothing bad happened last time.
DVSA figures show why that mindset doesn't hold up. In 2022, 14,300 HGVs were issued warnings or prohibitions for fuel system defects, and 38% of those were linked directly to non-compliant or missed tank inspections according to the Driver and Vehicle Standards Agency.
That should get every driver's attention.
What DVSA sees that drivers miss
A rushed walk-round usually misses the faults that matter most:
Fresh wetness under the tank that suggests a small leak rather than rainwater
Rub marks on fuel lines where vibration is wearing through the hose
Cap seals hardening or cracking so vapour or fuel can escape
Tank straps loosening so movement starts damaging brackets and mountings
Tampering signs such as disturbed locks, tool marks, or filler area damage
None of those faults looks dramatic at first. But each one can become a prohibition problem fast.
Practical rule: If you wouldn't be happy explaining the condition to a DVSA examiner at the roadside, don't drive it.
Why this matters beyond the walk-round
A missed defect doesn't stop at vehicle condition. Fuel leaks bring environmental risk. Unsafe tanks bring fire risk. Poor records bring operator risk. If you carry dangerous goods, your tank awareness also feeds into the standard of competence expected from an ADR driver.
That's the bigger point. A careful tank check isn't a box to tick before you climb into the cab. It's one of the clearest signs that a driver understands compliance, hazard awareness, and responsibility. The best drivers don't just look at the tank. They read it.
The Essential Pre-Trip Fuel Inspection
The fastest way to do this well is to follow the same routine every time. Don't wander around the vehicle hoping something catches your eye. Start at the tank and work in a set order so you don't skip anything.
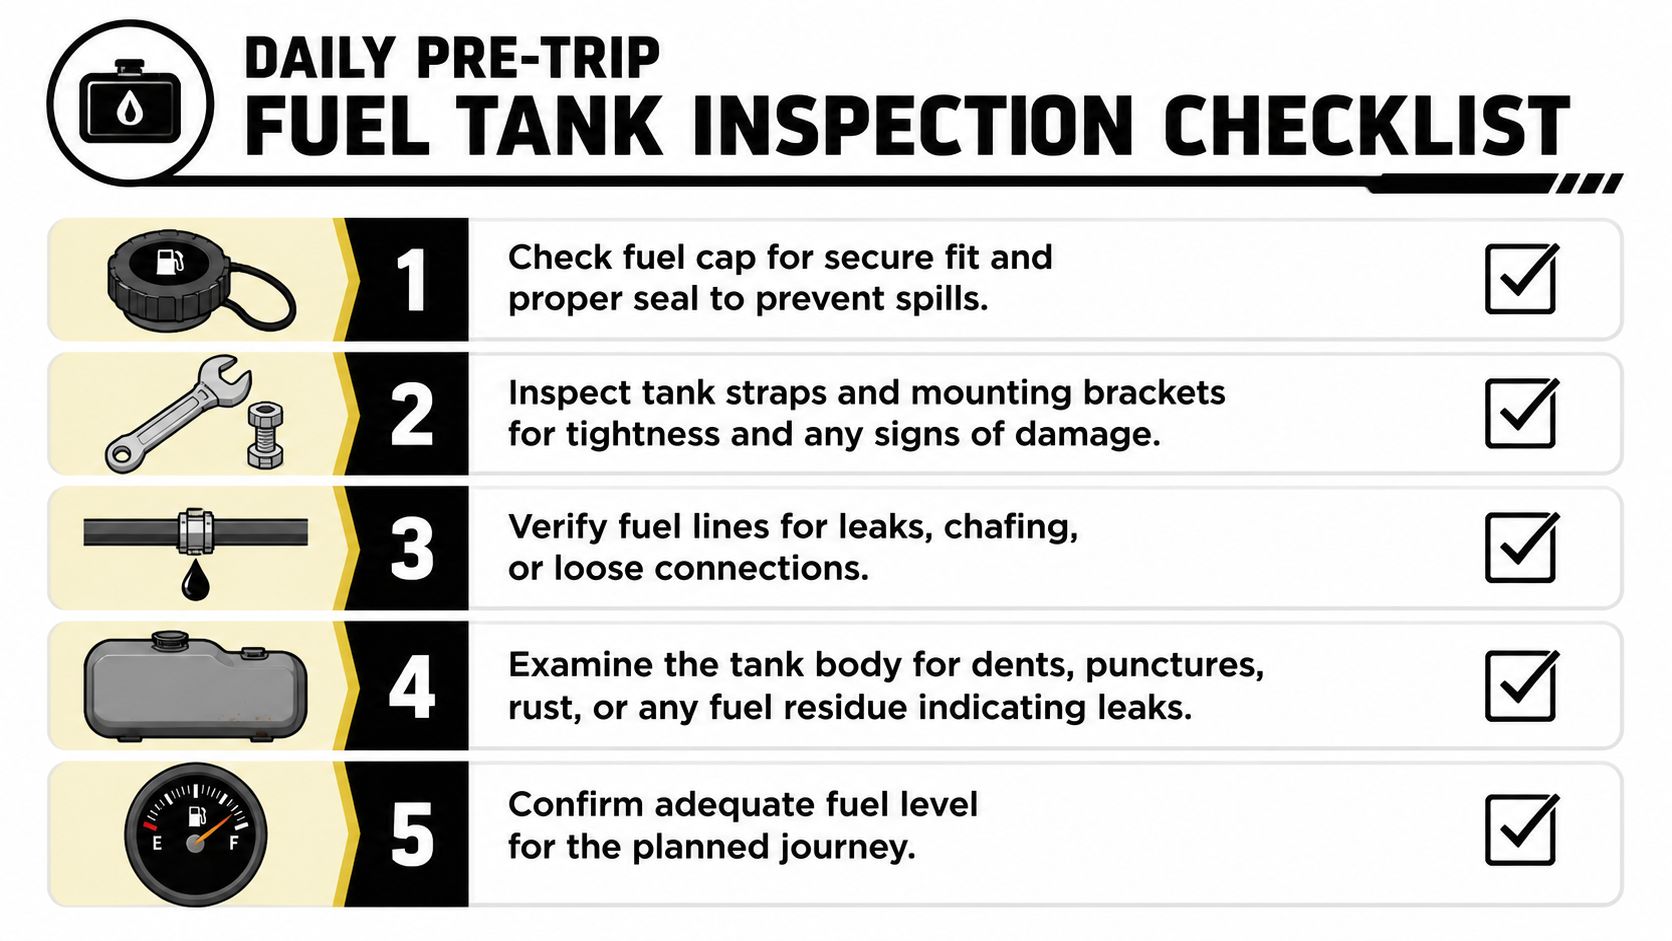
This visual guide is useful for locking in the habit:
Use the see feel and listen method
Before every journey, slow down enough to use your eyes, hands, and ears.
See the area first. Look on the ground under the tank and around the chassis rail. Dark staining, rainbow sheen, or damp patches need checking.
Feel the fittings. Run a hand over the cap, straps, brackets, and visible lines where safe to do so. You're checking for looseness, vibration wear, and wet residue.
Listen for odd signs. A hiss where it shouldn't be, rattling hardware, or a cap that doesn't seat cleanly all deserves attention.
The pre-trip order that works
Start with the outside of the tank body, then move tighter.
Tank shell condition. Look for dents, punctures, rust, scraped metal, or signs of impact damage.
Mountings and straps. Check that straps sit properly and brackets aren't bent, badly corroded, or loose.
Fuel cap and filler neck. Make sure the cap fits securely and the seal isn't damaged. If the cap feels rough or the thread doesn't seat cleanly, report it.
Fuel lines and joints. Follow visible pipes and connections. Watch for chafing, splits, staining, and loose fittings.
Vents and fittings. These need a proper visual check, not a passing glance.
Fuel level. Confirm you've got enough for the planned job and route, including delays or diversions.
For a wider walk-round routine, the HGV inspection manual is a useful refresher alongside your operator's own defect system.
A minimum legal baseline still matters here. DVSA requires a weekly visual check of vents, fittings, and pipelines, and failure to spot early fuel leakage can lead to immediate prohibition notices and fixed penalties of up to £1,000 per defect for the driver or operator, as set out in Maintaining your vehicle.
What drivers often skip
The filler area is a common blind spot. Drivers check whether the cap is present, but not whether the seal is sound, whether the neck has damage, or whether there are theft marks around the lock.
The second blind spot is underneath. If you never crouch down, you'll miss the early drip, the rubbed hose, or the strap that's started moving.
This walk-through helps newer drivers picture the job properly:
If the tank area smells strongly of fuel and you can't immediately explain why, stop and investigate before the key turns.
Deeper Checks for Structural Integrity
The daily check catches obvious faults. It doesn't always catch the slow structural ones. That needs a more deliberate look at the tank body, the fixings, and the surrounding support points.
Experienced drivers and workshop staff separate harmless wear from the start of a serious problem.
Read the tank from the ground up
Professional inspectors often use a ground-based systematic approach. That means they don't stare only at the tank shell. They start with what supports the tank and what would show evidence of failure.
Look at the area beneath and around the tank first. Check for:
Cracks or damage in the support area where movement may have started
Residue trails that show old leakage paths
Corrosion around bracket contact points where moisture and dirt sit trapped
Misalignment suggesting the tank is no longer sitting as intended
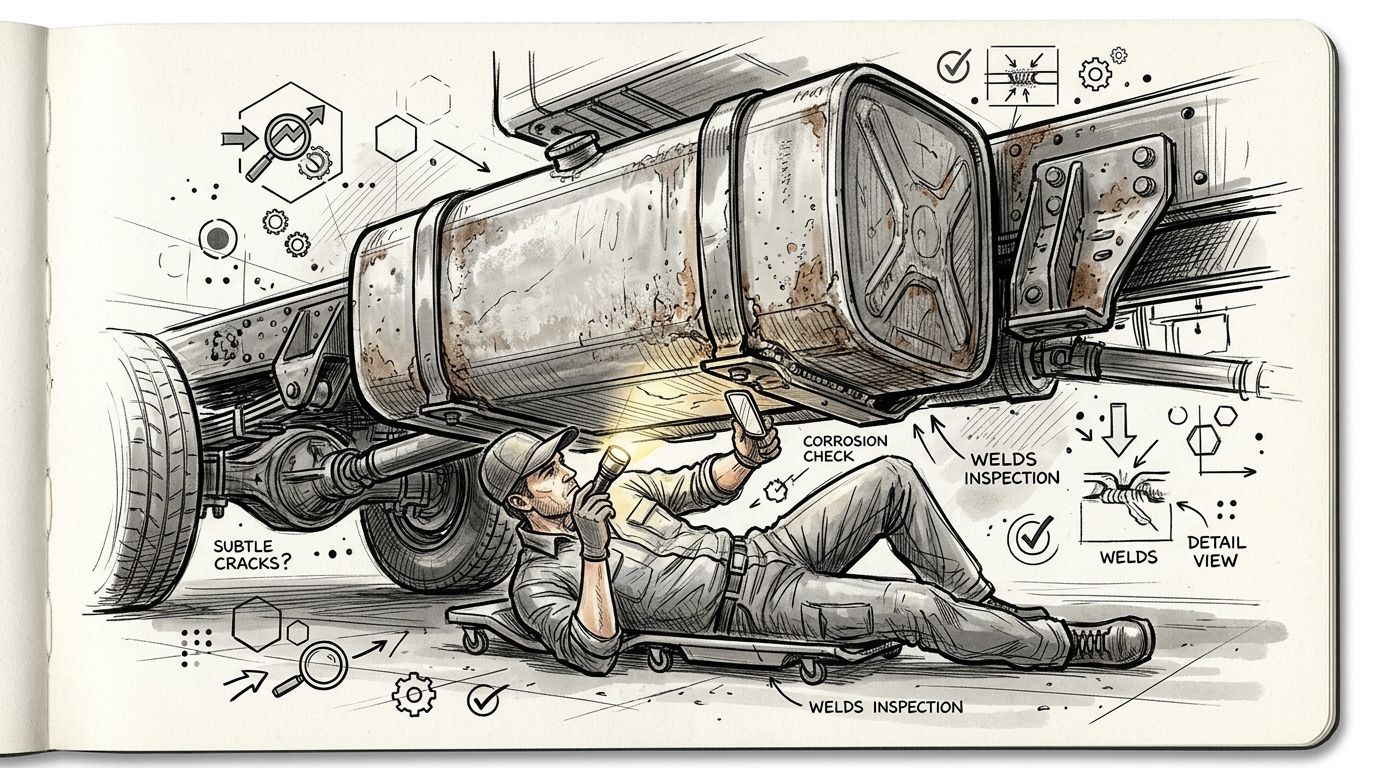
Then move to the shell itself. Pay close attention to seams, weld areas, lower edges, and corners where stress and moisture combine.
Paint blistering is not cosmetic
One mistake I see often is drivers treating paint damage as a bodywork issue. It isn't. On a fuel tank, coating breakdown can be an early warning of corrosion under the surface.
The UK Aboveground Storage Tank Annual Inspection Standard identifies coating failure or paint blistering as a primary precursor to structural corrosion, and missing it can lead to a 90% increase in leakage probability within 12 months, according to the Environment Agency.
That matters because blistering usually means the metal underneath is already being attacked. By the time the surface looks ugly, the protective barrier has already failed.
What to examine on a periodic detailed check
A more thorough fuel tank inspection should include these points:
Welds and seams. Look for hairline cracking, rust tracks, or damp marks.
Straps and mounts. Surface rust can be manageable. Deep scaling, metal thinning, or movement at the fixing points isn't.
Lower tank edges. Dirt and road salt collect here. So does hidden corrosion.
Internal risk areas where accessible. Corners and low points often hide the early damage.
Containment and surrounding hardware. If associated structures degrade, leaks become harder to control and easier to miss.
Workshop habit worth copying: Shine a bright light across the tank surface at an angle, not straight at it. Raised blisters, ripple lines, and edge corrosion show up much sooner.
When visual checks are not enough
Some faults hide until the metal has already lost thickness. That's where ultrasonic testing earns its place. If you want a plain-English overview of how that works in practice, this ultrasonic leak detection guide gives useful context.
A visual inspection is quick and necessary. It is not the whole job. If the tank has age, corrosion history, repeated vibration issues, or suspicious coating failure, a deeper test is the sensible move.
Safety Precautions Tools and Theft Prevention
Drivers sometimes treat fuel tank work as low-risk because diesel feels familiar. That's a mistake. Familiar jobs still hurt people when they get casual.
The tank area combines flammable liquid, vapour, metal contact, moving traffic, and in some cases criminal tampering. That means your approach has to be disciplined every single time.
Start with personal safety
Before you touch anything, make the area safe enough to inspect. That means stable footing, decent light, and no shortcuts around obvious hazards.
A basic working setup should include:
Suitable gloves. You want protection from fuel residue, sharp edges, and dirty fittings.
A bright torch. Dim yard lighting hides leaks and rust lines.
Eye protection where needed. Especially if you're checking underneath or near dirty brackets.
Clean rags or wipes. Useful for confirming whether a mark is fuel, grime, or standing water.
Keep ignition sources away. Don't inspect while smoking. Don't assume a tiny leak is harmless because the vehicle is outdoors.
Earthing is not paperwork trivia
The earthing check gets ignored because drivers don't always see the danger. The risk is static discharge during refuelling. That's why this point is enforced, not suggested.
The HSE requires a monthly visual check and an annual test of the HGV's fuel tank electrical earthing under DSEAR. A faulty earth strap can cause static discharge during refuelling, creating a fire hazard that can trigger immediate prohibition and unlimited fines, as explained in the HSE DSEAR guidance.
When you inspect the earth strap visually, look for corrosion, damage, insecure mounting, and anything that suggests poor contact with the chassis. If it looks suspect, don't guess. Report it.
A missing or corroded earth strap can sit unnoticed until the day it matters most. That's why good operators treat it as a safety item, not an electrical detail.
Theft signs drivers should recognise
Fuel theft often shows up first as a condition issue, not a missing quantity report. A driver who knows what tampering looks like can stop repeat losses and prevent contamination.
Watch for:
Fresh tool marks round the filler cap or locking area
Damaged cap threads or bent lock hardware
Loose or disturbed fuel lines
Unusual debris or cut marks near access points
Fuel level not matching the last known position
If you suspect siphoning, don't just refit the cap and drive away. Check the surrounding area, note what you've found, and report it through the proper defect or incident route.
The right tools make the check better
A proper inspection isn't done well with a quick boot scuff and a glance from standing height. Keep simple kit available and use it properly. A torch, gloves, wipes, and a disciplined routine will catch more faults than most drivers expect.
Theft prevention is part of that same mindset. Secure caps, working locks, clean threads, and attention to the filler area all reduce risk. Drivers who spot tampering early protect the load, the vehicle, and the schedule.
DVSA Compliance Reporting and Your ADR Licence
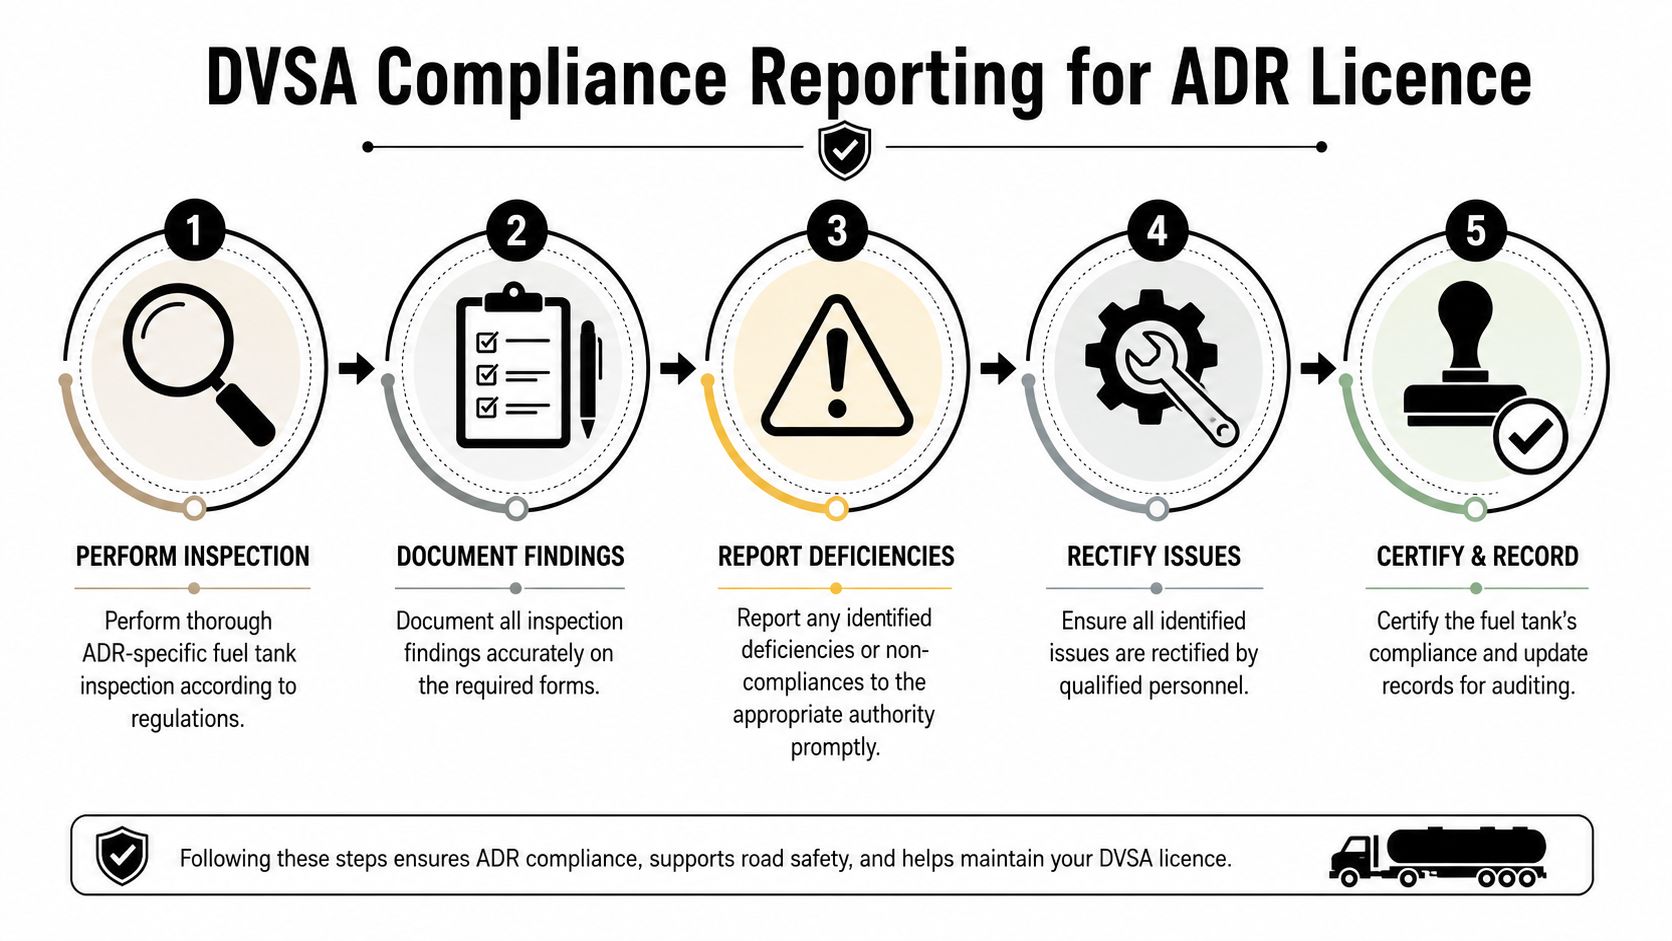
Finding the fault is only half the job. If you don't record it properly, as far as compliance is concerned, it might as well never have been checked.
That's the part many drivers resent, but it's also the part that proves competence. A clean inspection routine without clear records won't help much if DVSA asks what was checked, when it was checked, and what happened when defects were found.
What a good defect record includes
A useful report is specific. “Tank looks poor” is no use to a workshop, a transport manager, or an examiner. Record what you saw, where you saw it, and whether the vehicle was taken out of service or referred for repair.
Good entries usually cover:
Exact location of the problem. Nearside front strap, filler cap seal, lower rear seam, vent fitting, and so on.
What you observed. Wetness, crack, corrosion, loose bracket, damaged lock, perished seal.
Action taken. Reported to workshop, vehicle parked, monitored under instruction, repair booked.
Date and signature or digital confirmation. The record must identify who carried out the check.
This isn't admin for admin's sake. It gives the operator evidence of due diligence and gives the next person a clear starting point.
Why ADR drivers need more than a pass certificate
This issue gets missed in training. Drivers can hold ADR certification yet still struggle during a real roadside inspection because they were taught the theory of dangerous goods, not the practical standard of tank awareness. Our own ADR licence training course builds that practical standard in from the start, rather than leaving it to be picked up on the job.
That gap is wider than it should be. A Department for Transport report says 34% of HGV operators list inspection violations as a top risk, yet only 12% of ADR training providers include structured tank inspection modules, according to the Department for Transport.
That matters under the competent person expectation tied to hazardous goods work. If you carry dangerous goods, you need to recognise obvious tank defects, report them correctly, and understand when the vehicle should not move.
For drivers moving into specialist work, it helps to understand how ADR training fits into UK licence progression. This guide to ADR in the UK gives the wider framework.
Reporting discipline protects your licence
The practical standard is simple. If you find something, write it down clearly. If it affects safety, don't let anyone talk you into “keeping an eye on it” while the vehicle goes out anyway.
A strong reporting culture also helps operators manage fleets properly. Broader systems matter here, especially when defects, servicing, driver checks, and audit readiness all have to line up. These effective fleet management strategies are a useful reminder that good compliance usually comes from good systems, not last-minute fixes.
On the roadside, paperwork is evidence: a driver who can explain the defect reporting trail looks competent. A driver who says “I mentioned it to someone” looks exposed.
The habits that impress examiners and managers
Drivers who stay out of trouble tend to do the same few things well:
They report small faults early. A poor seal today is easier than a leak tomorrow.
They write clearly. No vague wording, no missing details.
They follow up. If a defect was logged yesterday, they check whether it was repaired before driving.
They understand limits. Not every issue means immediate prohibition, but some absolutely do.
Fuel tank inspection moves beyond a routine check, becoming a professional skill. It proves judgement. It proves consistency. And for ADR work, it proves you can handle more responsibility than merely steering the vehicle from A to B.
Common Faults Fixes and Training Tips
Most tank faults fall into familiar patterns. The trick is knowing which ones mean stop, which ones mean report and repair, and which ones need watching before they turn serious.
Here's a quick-reference table I'd be happy to put in front of any trainee.
HGV Fuel Tank Fault Finder
Symptom / Fault
Potential Cause
Driver Action
Fuel smell around tank area
Minor leak, poor cap seal, loose fitting, recent spill
Inspect closely, confirm source, report immediately if active leak is suspected
Damp stain or drip under tank
Leak from seam, line, fitting, or cap overflow
Do not ignore it. Report at once and follow operator instructions before moving
Cap won't tighten properly
Damaged thread, worn cap, dirt in filler neck
Clean only if safe and simple. If it still won't seat, report and do not rely on it
Rust blistering on tank surface
Coating failure and corrosion starting underneath
Report for deeper inspection. Don't treat it as cosmetic
Clean as instructed and re-check condition underneath
Fuel level lower than expected
Theft, leak, recording error, gauge issue
Check for tampering and leakage, then report discrepancy
What works in training
Drivers learn tank inspection best when they handle real faults, not just tidy training vehicles. A good instructor uses worn caps, damaged straps, corroded brackets, and marked-up photos so trainees learn what “wrong” looks like.
Three methods work especially well:
Scenario checks. Give the trainee a vehicle with planted defects and ask for a proper walk-round and written report.
Fault comparison. Show two similar components, one serviceable and one not, then ask the trainee to justify the difference.
Short repeat drills. Five minutes at the start of each session builds better habits than one long lecture.
A new driver doesn't need to become a tank engineer. They do need to know what normal looks like, what unsafe looks like, and when to say the vehicle shouldn't leave the yard.
If you want structured support with HGV licences, ADR preparation, and the practical standards drivers are expected to meet on real UK roads, HGV Learning can help you build those skills properly from the start.
What Age Can You Start HGV Driver Training? A 2026 UK Guide to Licence Age Requirements
If you're asking what age you can start HGV driver training, the honest answer depends on which licence you're after. A C1 licence, covering vehicles...