That little slip of paper that rolls out of the tachograph unit can feel a bit intimidating. It’s covered in symbols, charts and numbers, but it’s arguably the most important document you’ll handle on a daily basis, especially if you get pulled over for a roadside check.
This guide is designed to strip away the confusion and show you exactly what you’re looking at. Think of it as your practical first step to mastering your tacho records.
Your Guide to Reading a Tachograph Printout
Whether you’re a new driver just getting to grips with everything or a seasoned pro who wants a quick refresher, understanding this printout is non-negotiable. It’s the key to proving you’re compliant with the drivers’ hours regulations and protecting both your own licence and your operator’s.
We’ll break down each part, piece by piece, so you know exactly what everything means and why it matters.
Why Do We Even Have These Rules?
The foundation of our current tacho rules comes from the EU, specifically Regulation (EC) No 561/2006. This is what brought in digital tachographs for all new vehicles from 1 May 2006, a massive shift that impacted over 500,000 HGVs and buses by 2010.
The printout is simply a physical copy of your digital record. It gives you a clear, visual snapshot of your daily activity, showing all your driving, rest and other work periods. At a roadside stop, you need to be able to show records for the current day and the previous 28 days for UK journeys.
Keep in mind, though, that this is changing. For international trips into the EU, you’ll need to produce records for the current day and the last 56 days from 31 December 2024.
Key Sections to Check First
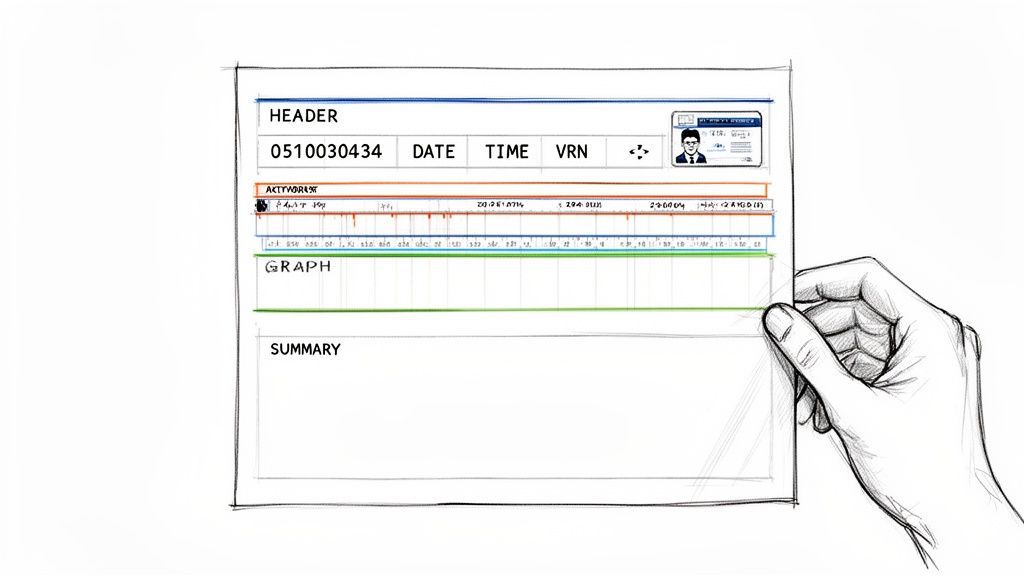
Before you start trying to decode symbols and timelines, get familiar with the basic layout. Just a quick scan of these main areas can tell you if the record is correct and valid straight away.
Here’s a quick reference table to get you started. It breaks down the main sections of the printout, what they tell you, and why they’re so crucial for staying on the right side of the DVSA.
Key Sections of a Tachograph Printout
Section Name
Information It Contains
Why It Is Important
Header
Driver’s name, driver card number, vehicle registration number (VRN), and the date and time of the printout.
Instantly verifies who the record belongs to and which vehicle was used. Any mismatch here is an immediate red flag for an inspector.
Activity Graph
A 24-hour visual timeline showing chronological blocks of driving, other work, periods of availability (POA), and rest/breaks.
This is the core of the record. It provides a quick, graphical summary of your entire day, making it easy to spot patterns and potential issues.
Summaries
Totals for your daily activities, such as cumulative driving time, total break duration, and details of any recorded faults or events.
These figures provide the hard data. They are used to quickly check compliance with daily driving limits, break requirements and rest periods.
Getting these basics right is the first step. If the header information is wrong, nothing else on the printout matters because it can’t be tied to you or your vehicle.
A tachograph printout isn’t just a receipt; it’s a legal document. Treating it with care and understanding its contents is a core responsibility for any professional driver. Ensuring its accuracy is your first line of defence during any inspection.
Understanding the Header and Driver Information
The very top of a tachograph printout is like its official ID card. Before you even get to the graphs and summaries, this header section is what ties you, your vehicle and your journey together into one legally binding document. Getting this bit right is your first and most important check.
Think of it as the title page of your daily report. It contains all the essential details that a Driver and Vehicle Standards Agency (DVSA) officer will look at first. If anything here is wrong, the entire printout could be called into question.
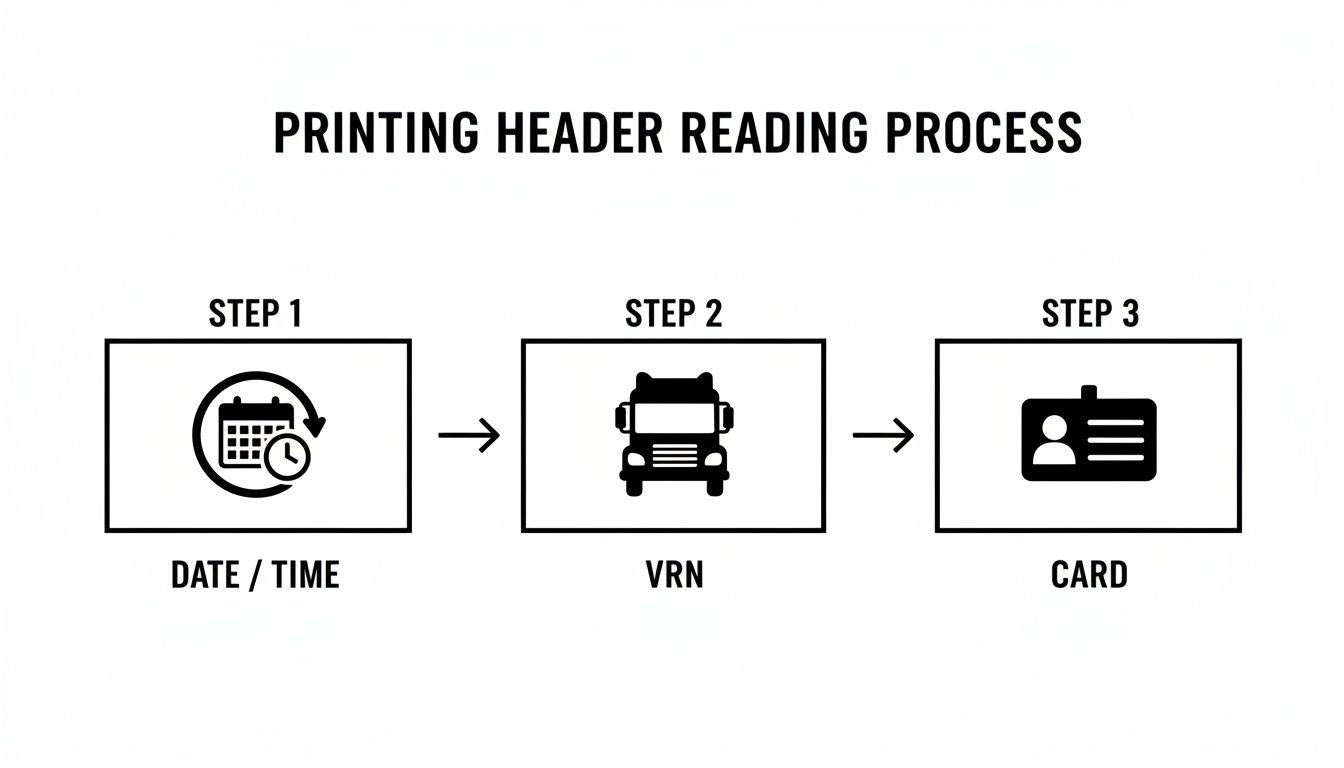
Your Initial Data Checklist
Your first job is to scan this top section for accuracy. It’s a quick habit that can save you a world of trouble down the line. A quick glance should confirm several key details are present and correct.
Date and Time: You’ll usually see two times listed. One is the local time, and the other is Coordinated Universal Time (UTC). UTC is the standard for all tachograph systems, so don’t panic if it’s an hour different from your watch during British Summer Time.
Driver Information: Check that your full name and driver card number are displayed correctly. This is the crucial link that proves the record belongs to you.
Vehicle Details: The Vehicle Registration Number (VRN) must match the truck you are driving. You’ll also see information about the Vehicle Unit (VU) itself, including its manufacturer and serial number.
Mismatched information is an immediate red flag. For example, if the VRN on the printout doesn’t match the vehicle you’re in during a roadside check, you’ll have some serious explaining to do.
Spotting and Handling Common Errors
Mistakes happen, but knowing how to deal with them is what marks you out as a professional driver. It’s not just about what the printout says, but how you react when it’s wrong.
A common problem is the printer running out of paper mid-print. This can easily happen with a long daily printout, leaving you with an incomplete record. If this happens, that printout is not legally valid on its own.
By law, you must manually write the missing information on the back of the incomplete slip. This includes adding your name, driver card number, VRN, the date, and your signature. This simple act turns an invalid piece of paper into a compliant record.
Another classic scenario is when the time or date is wrong because of a VU fault. If you spot this, you must report it to your transport manager immediately. You should also take a printout and make a manual note on the back explaining the problem, then sign and date it. Taking this proactive step shows you’re transparent and committed to staying compliant.
Why This Section Is Your First Line of Defence
Ultimately, the header information sets the scene for everything that follows. It proves you were in control of a specific vehicle during a specific period. Without that verifiable link, the detailed activity graph becomes meaningless from an enforcement point of view.
By carefully checking these details every single time you pull a printout, you’re building a solid foundation of accuracy. It shows that you’re actively managing your records and taking your professional duties seriously—which is exactly what a DVSA officer wants to see. It’s a simple check that provides powerful protection.
Interpreting the Daily Activity Graph and Symbols
At the very heart of your tachograph printout is the daily activity graph. Think of it as the visual story of your entire working day, neatly laid out on a 24-hour timeline. Getting comfortable reading this graph is absolutely essential—it’s how you can check your own compliance and spot small issues before they snowball into serious infringements.
The graph itself is built around four core symbols that represent everything you do. Once you know these, you can decode your day’s work in a single glance.
The Four Core Activity Symbols
Every minute of your shift is logged into one of four modes. These are shown as simple pictograms that are standard across all digital tachograph units, so you’ll see the same ones everywhere.
Driving (Steering Wheel): This symbol pops up whenever the vehicle is moving. It’s recorded automatically by the Vehicle Unit (VU) and is, without a doubt, the most closely scrutinised part of your record.
Other Work (Crossed Hammers): This mode is for any work you’re doing that isn’t driving. Think vehicle checks, loading and unloading, paperwork, or even cleaning the cab. It’s up to you to manually select this mode.
Availability (Square with a Line): Often called Period of Availability (POA), this is for times you’re on standby but not actively working. Good examples include waiting for a loading bay to open up or when you’re the second driver in a crewed vehicle. Crucially, this is not a break.
Rest/Break (Bed): This symbol marks any of your statutory breaks or rest periods. To log this legally, you must be completely free from all duties and able to do whatever you want with your time.
Getting the difference between these is vital. For example, if you log a Period of Availability as a Rest period by mistake, you could easily end up with a major infringement for not taking a sufficient break. You can dive deeper into these rules in our comprehensive digital tachograph guide.
Before you even get to the graph, it’s a good habit to check the header information on the printout. This image breaks down what to look for.
A quick check to confirm the date, your vehicle’s registration number (VRN) and your card details ensures the whole record is correctly assigned to your journey.
A Guide to Common Tachograph Symbols
To help you get familiar with what you’ll see on your printout, this table breaks down the key pictograms. These symbols tell the whole story of your shift, from driving and working to specific events like inserting your card or encountering a fault.
Symbol
Name of Activity or Event
What It Actually Means for You
Driving
Time spent with the vehicle in motion. This is automatically recorded.
Other Work
Any work-related duty other than driving, like loading or vehicle checks.
Rest/Break
Legally required breaks or rest periods where you are free from duties.
Availability (POA)
Time spent available for work but not actively engaged, like waiting.
Driver Card
Represents your personal driver card.
Unknown Activity
A period where no card was inserted, creating a gap in the record.
Event or Fault
Indicates a system event (like overspeeding) or a technical fault.
Printout
This symbol marks the time a printout was generated from the unit.
Knowing these symbols inside out allows you to quickly verify your records and speak confidently about your activities during any roadside check.
Reading the Timeline: A Practical Example
Let’s walk through how these symbols appear on the graph for a typical multi-drop delivery driver. The timeline always reads from left to right, covering the full 24 hours.
The driver clocks in, does their daily walk-around check and then hits the road. On the printout, this would show a block of Other Work (the crossed hammers) followed immediately by a block of Driving (the steering wheel).
After a couple of hours on the road, they pull into their first drop. There’s a queue for the loading bay, so they switch the tacho to Availability. As soon as the bay is free and they start unloading, they switch it over to Other Work. This sequence paints a clear, second-by-second picture of exactly what they were doing.
The real power of the graph is in the quick visual check. You should be able to spot a solid 45-minute block (or the split 15 then 30 minutes) of the ‘Bed’ symbol before you hit your 4.5-hour driving limit. If you can’t see it easily, something might be wrong.
Why This Visual Check Is So Important
This graphical chart is your first line of defence. Long before you start digging into the totals and summaries at the bottom of the slip, a quick scan of the graph can reveal obvious problems. Does that block of driving time look a bit too long? Are there enough breaks dotted through the day? Are there any weird gaps you can’t account for?
Mastering this skill is non-negotiable for anyone in UK logistics. It helps you stay on the right side of the law and avoid fines. By checking your activity graph regularly, you start to spot your own patterns. Maybe you’re consistently pushing that 4.5-hour driving limit, which tells you it’s time to plan your stops better. It transforms the printout from a piece of legal red tape into a genuinely useful tool for managing your day and staying compliant.
How to Analyse Summaries and Infringements
Once you move past the graphical chart, you get to the hard data. This is where the tachograph unit lays out your activities in black and white, logging any events or infringements along the way. Honestly, learning to read this section is non-negotiable for protecting yourself and keeping your operator’s licence safe.
Think of it this way: the graph tells the story of your shift, but this summary section delivers the final verdict. It gives you the totals for driving, work, availability and rest, giving you a chance to cross-reference everything and confirm you’ve stayed on the right side of the law.
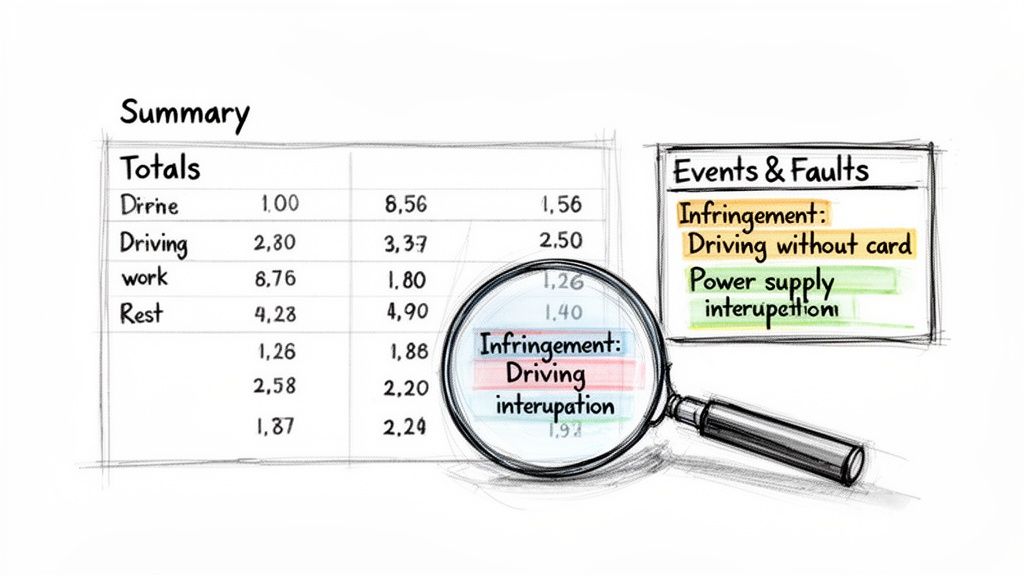
Decoding the Daily and Weekly Summaries
The summary section provides a clean breakdown of your cumulative times. It’s the first thing an enforcement officer will glance at to get a quick overview of your day, so you should be doing the same. Make it part of your daily debrief.
You’ll see clear totals for different periods, usually for the day and often a weekly summary, too. These figures are your best friend when it comes to self-auditing.
Total Driving Time: Does this match the 9-hour daily limit? Or the extended 10 hours, if you’ve used it?
Work and Availability: These numbers are key for calculating your total working time and making sure you’re not falling foul of the Working Time Directive.
Total Rest: This must meet the minimum daily or weekly rest periods. For example, a regular daily rest needs to be at least 11 hours. If you need a refresher, check out our guide on understanding drivers’ hours rules in our comprehensive guide.
Getting into this simple cross-referencing habit can help you spot a potential issue long before it becomes a real problem at a roadside check.
Understanding the Events and Faults Log
Right below the summaries, you’ll find a log of any ‘Events and Faults’. This is where the tachograph flags specific incidents that could point to a rule breach or an equipment problem. The messages can seem a bit cryptic at first, but they are incredibly important.
Effectively reading this log is all about spotting the key data points. In a way, it’s a similar skill to learning how to extract data from various documents, where the goal is to isolate and interpret critical information from a structured format.
Some of the common alerts you’ll see are:
Driving without card: A massive red flag. This means the vehicle was moved without a driver card inserted.
Power supply interruption: This could suggest tampering, but it can also be triggered by a genuine electrical fault.
Over-speeding event: This gets logged when the vehicle goes over 90 km/h for more than a minute.
Each of these events needs your attention. A DVSA officer will absolutely ask you to explain them, so having a clear answer ready is essential.
How to Handle Flagged Infringements
Seeing an infringement on your printout is never a great feeling, but how you react makes all the difference. The key is to be proactive and transparent. If an event is flagged, you need to annotate the back of the printout right away.
For instance, that ‘over-speeding’ event might have happened while you were safely overtaking on a downhill stretch of motorway. If so, make a note on the back of the printout explaining the situation. Write the date, time and the reason, then sign it.
Your manual note is your official statement. It proves you’re aware of the event and have a legitimate reason for it. It shows professionalism and can be the deciding factor between a simple warning and a fixed penalty notice.
Likewise, if you slightly exceeded your driving time to reach a safe parking spot, you must document it. If you don’t, you leave the infringement open to interpretation, and an officer will always assume the worst if there’s no explanation.
By diligently checking your summaries and correctly annotating any infringements, you take control of your records. It’s a simple practice that protects you, proves your compliance, and reinforces your status as a responsible, professional driver.
Putting It All into Practice for DVSA Compliance
Knowing your way around a tacho printout is one thing, but applying that knowledge day in, day out on the road is what really matters. This is where the theory hits the tarmac. A simple slip-up or a forgotten entry can easily lead to a roadside fine, so getting these daily habits right is absolutely crucial.
Think of your tacho records as the complete diary of your working life. Any gaps will immediately raise red flags. That’s why the Driver and Vehicle Standards Agency (DVSA) demands a continuous, unbroken record of your activities—and it’s your job to fill in any blanks when you’ve been away from the truck.
Managing Time Away from Your Vehicle
You have to account for all your time, even when your driver card isn’t physically in a tachograph. This covers everything from sick leave and annual holidays to time spent doing other work, like helping out in the warehouse or attending a training course.
When you get back to your vehicle and pop your card in, the tacho unit will prompt you to make a manual entry to cover the period the card was out. This is your chance to log that time correctly and keep your records straight.
For Sick Leave or Holidays: Simply select the ‘Rest’ mode (the bed symbol) for those full days.
For Other Work: If you were grafting in the yard or warehouse, you must log this as ‘Other Work’ (the crossed hammers symbol).
Forgetting to make these entries is one of the most common ways drivers get caught out. If you do forget, the best thing to do is take a printout straight away, write the details of what you were doing on the back, and then sign and date it.
Changing Vehicles During a Shift
It’s pretty common to switch trucks or trailers during a working day. The procedure here is strict and you need to follow it to the letter to keep your records legal and continuous.
Before you take your card out of the first vehicle, you must take a printout of your daily activities up to that point. This printout acts as the legal record for that part of your shift. You then keep this physical copy with you. When you start up in the next truck, your new tacho record begins, but the printout from the first one gives the full picture for any roadside inspection.
An enforcement officer needs to see your entire working day. A record from just one vehicle isn’t enough if you’ve driven more than one. Always take a printout when you finish your duties in a vehicle, even if you’re just moving it around the yard.
Dealing with Tachograph Malfunctions
Let’s face it, equipment can fail. If your tachograph unit packs in while you’re on the road, you are legally required to keep a manual record. If you can, take a printout at the start of your journey and another one at the end.
On the back of the print roll, you’ll need to jot down:
Your name and driver card number.
The periods of driving, other work, availability and rest.
Your signature.
This manual log becomes your temporary legal record until the unit is fixed. You must tell your transport manager about the fault as soon as it’s safe to do so, and the repair must be done by a certified technician at the first opportunity.
Record Keeping for Roadside Stops
Finally, don’t forget the rules on keeping records. In the UK, you must be able to show tachograph records for the current day and the previous 28 days during a roadside check. It’s vital to keep these printouts organised, clean and somewhere you can get to them easily.
When you hand them over to an officer, be professional and have everything in order. This includes any printouts where you’ve manually written notes to explain infringements or other events. A tidy, complete set of records shows you’re a professional who takes compliance seriously, which can make any inspection go a lot smoother.
Frequently Asked Questions About Tachograph Printouts
Even when you feel you’ve got the hang of your tacho, real-world situations on the road can throw a spanner in the works. Knowing how to handle these moments correctly doesn’t just keep you compliant—it gives you the confidence to manage any roadside inspection like a true professional. Let’s run through some of the most common questions we hear from UK drivers.
What Should I Do If the Printout Shows an Infringement I Disagree With?
If a printout flags an infringement you believe is wrong or happened for a good reason, you need to deal with it straight away. The first and most important thing to do is make a note on the back of the printout itself.
Jot down the date, time and a clear, short explanation of what happened, then sign it. For instance, maybe you had to drive a few extra minutes to find a safe place to park. This handwritten note is your best defence; it shows you’re being upfront and professional. You should also flag it with your transport manager so they can look at the raw data.
How Do I Record Other Work Done Away from My Vehicle?
It’s a legal requirement to keep a continuous record of your duties, and that includes time spent away from the truck. Whether you’ve been helping in the warehouse or sitting in a training course, you must make a manual entry when you get back to your vehicle.
Before you pop your card in, the tachograph will ask you to account for the time it’s been out. Simply use the buttons to select the ‘other work’ mode (the one with the crossed hammers symbol) and set it for the correct duration. If you forget, don’t panic. Just take a printout immediately, write the details of your ‘other work’ on the back, and sign and date it.
Failing to account for this time creates a gap in your record, which is a common and easily avoidable infringement. A complete record proves you are managing your time correctly and adhering to working time regulations.
Do I Need a Printout Every Time I Change Vehicles?
Yes, this one is non-negotiable. When you finish your shift in one truck, you are legally required to take a printout before you remove your driver card. Think of that printout as the official record for that leg of your journey.
You must keep that physical copy with you when you move to the next vehicle. If you’re stopped, an enforcement officer will want to see a complete, unbroken log of your day, which means having the printouts from every single vehicle you’ve driven. This ensures your activity log is continuous and fully accounted for, leaving no room for doubt.
What Is the Difference Between a Break and a Period of Availability?
Getting this right is crucial for avoiding infringements related to breaks. The two modes might seem similar, but in the eyes of the law, they are completely different.
A Break or Rest (the bed symbol) is time when you are completely free from any and all work duties. During a proper break, you can do whatever you want. This is the only activity that counts towards your legally required breaks.
A Period of Availability (POA) (the square symbol) is basically waiting time. You aren’t actively working, but you have to be ready to start. Good examples include waiting for your truck to be loaded or sitting as a second driver in a crewed vehicle.
Because you aren’t free to do as you please, POA does not count as a legal break. Getting these periods categorised correctly is vital, especially if you’re ever in a situation like having a lost tacho card and need to make accurate manual records. You can learn more about managing a lost tacho card in our detailed guide.
Mastering your tachograph is a key step in becoming a safe, compliant and professional driver. At HGV Learning, we provide expert training to equip you with the skills needed for a successful career on the road. Start your journey with us today at https://hgvlearning.com.
Related Articles
01/07/2026
ADR Driver Salary UK: Your 2026 Earnings Guide
You're probably here because you typed something like “ADR driver salary UK” into Google and got a mess of answers. One page shows a fairly...